It was a little over two years ago that I first saw it. We were in Canberra for our annual Year Six visit to the capital and were visiting Questacon, the National Science Museum. This is always a highlight of the trip for the students who enjoy the hands-on nature of the displays. For them this is a chance to ‘play’ with science, to encounter new ideas and experience the wow factor of a museum full of excitement. As a teacher with an interest in both science and the creative use of spaces Questacon is the perfect place to spend a few hours after a long day of marshaling students in and out of national monuments were expectations for respectful behaviour has tested their limits.
It was on one of the upper floors that we encountered the exhibit that was to inspire a multi-year project. A display of the Periodic Table of Elements that led a small group of teachers to explore the possibility of having a similar display as part of our Junior School. Instantly we saw the potential in this one display item to become the object that encourages our students to get excited about science and to clearly identify to all that our science lab is the place for serious investigation and scientific inquiry. Had we known then how much time and energy this project would ultimately take we might have walked away, but as is the case with all big ideas once you realise how much you have taken on it is too late to stop.
The next part of the process went surprisingly well and with the support of our Head of School we secured funding for the project from our Parents and Friends Association. This was the point where our investigations became serious and we quickly discovered that the cost of the display at Questacon was quite enormous, very much on the budgetary scale of a national museum and not a medium sized primary school. Our budget would not stretch anywhere near the amount required to purchase the sort of display we were after. From here we started brainstorming possible solutions to this problem including digital alternatives, interactive displays utilising iPad software, printed wall dressings and mixed media options with QR codes to trigger interactive elements. All of these options were nice but none captured our imaginations like that original piece of cabinetry and carefully selected physical samples had.
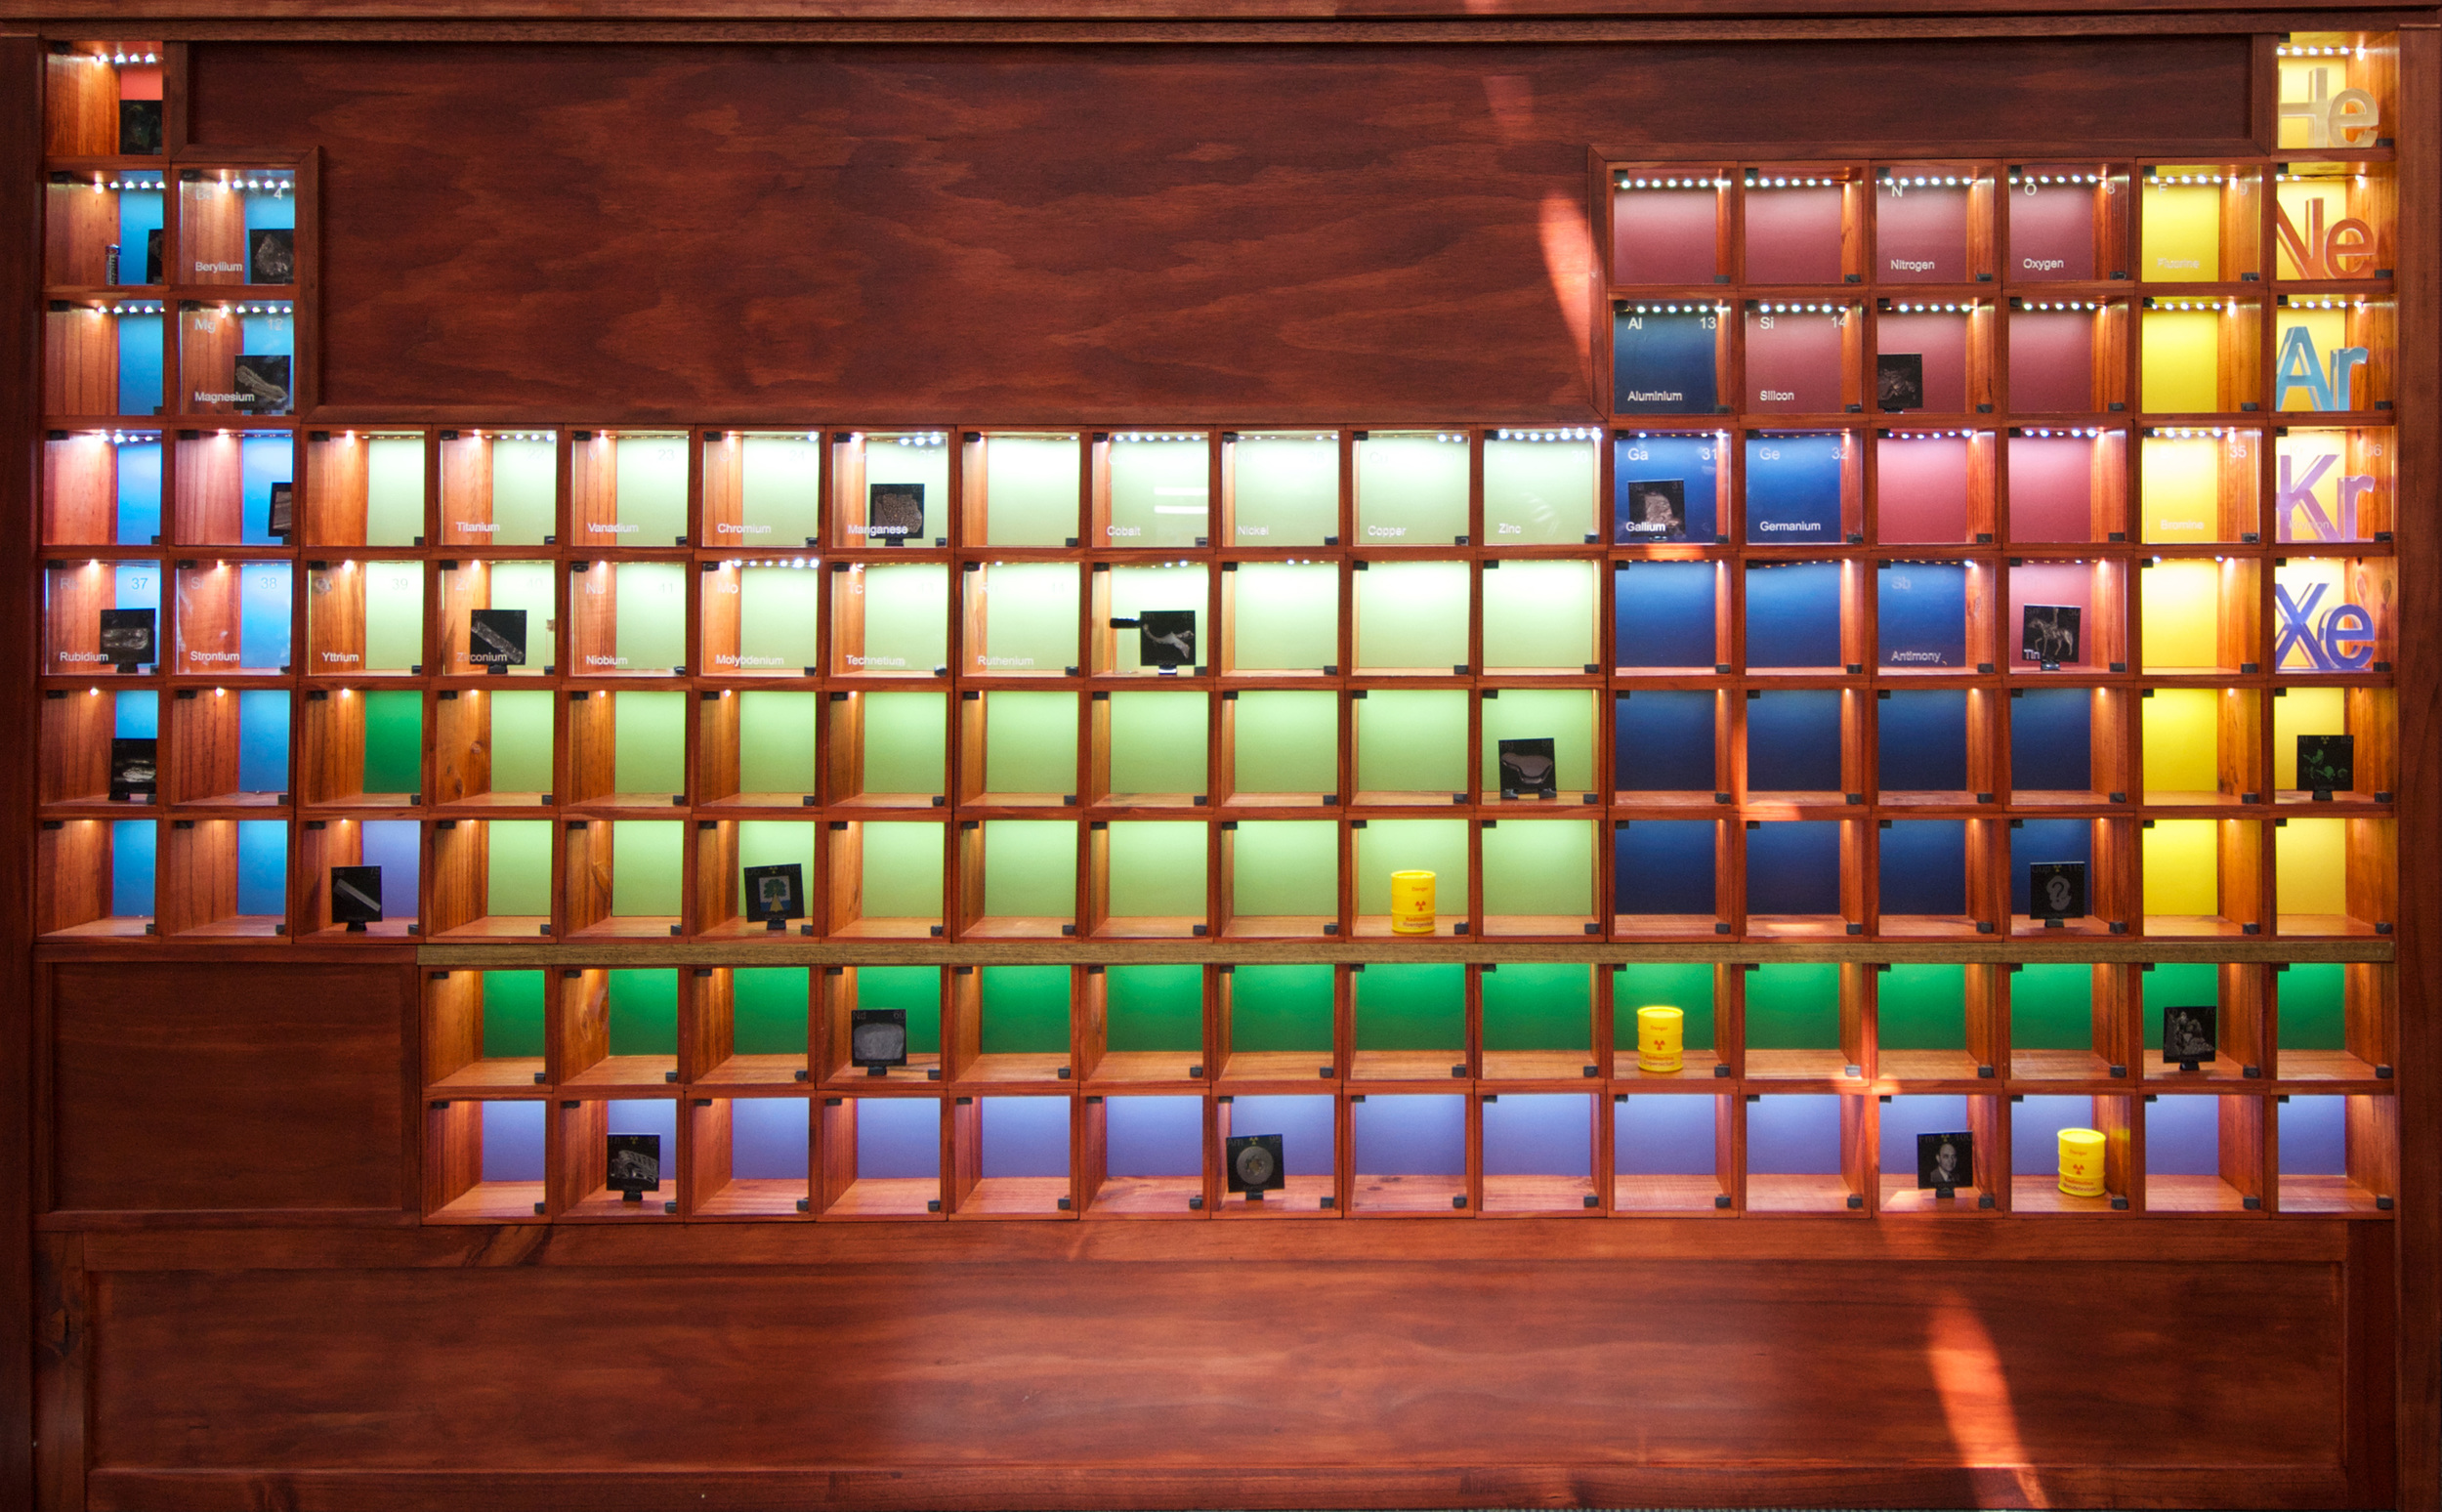
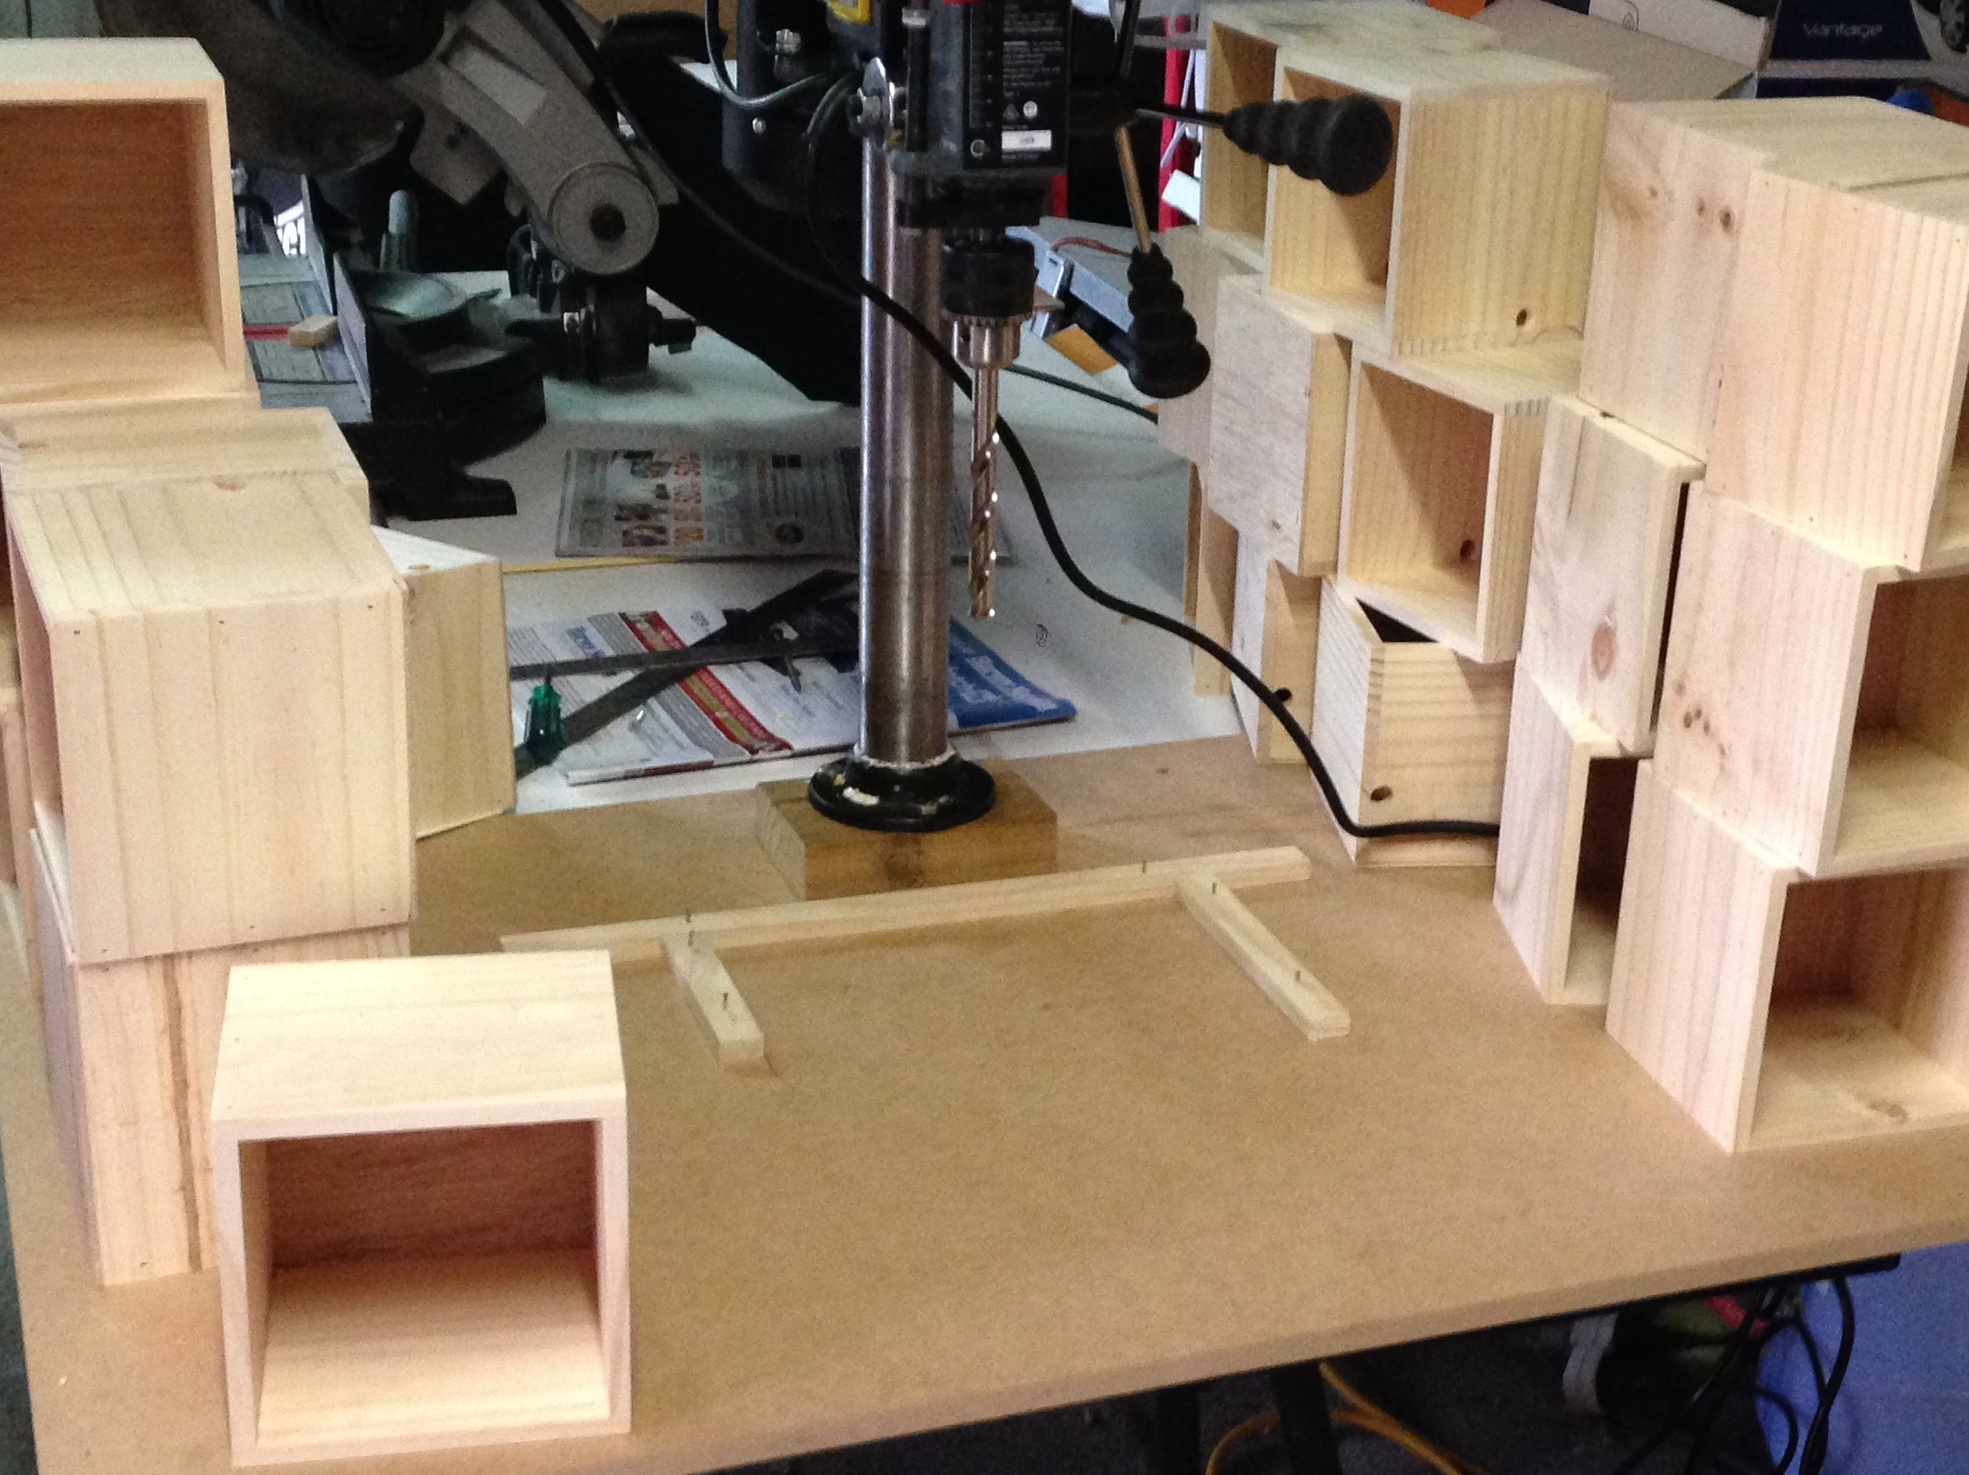
One option that we kept going back to was linked to the nature of the display case we had seen. In essence it is a nest of boxes arranged in the well-known shape of the Periodic Table. Each box is illuminated and has a plastic door. Around this nest of boxes is cabinetry that holds it all together and conceals the wiring for the lighting. The difficult part in this arrangement is the sheer number of boxes required and the uniformity of size required of each box for them to nest together. The box plan relied on being able to purchase the required 118 boxes at a reasonable price and with a suitable degree of accuracy. Eventually we located a supplier who could provide what we were after. The Wooden Box Factory based in Victoria builds boxes for a variety of purposes, typically packaging and gift boxes. Their catalogue includes a variety of pine boxes with plywood backs with internal dimensions of around 120 mm square. This seemed perfect and after many long discussions and recognition that we were almost at the anniversary of the projects approval, we purchased the required number of boxes. It was not until much further along in the process that it was realised that our decision to use this particular box size had made life much more difficult than it needed be, but more on that when we get there.
The plan once we had the boxes was for our school maintenance team to join them all together and construct a simple piece of cabinetry to bind it all into one piece. Initial discussions went well but as the size of the task became apparent an alternative plan was sought. Quotes from cabinetmakers were sought and our budget was quickly found to be lacking. We had possibly one-third of what we would require. We were also at this stage very committed to the project having already paid for the boxes and made many promises that the Periodic Table would be delivered. After much back and forth, consultation with experts and quite a few sleepless nights I decided that the task was not all that difficult and that given a couple of weekends, a large piece of MDF to mount the boxes too and a few other bits of timber I could do it myself. I quite clearly remember the conversation with my Head of School where I outlined this plan with the greatest of confidence. Looking back it is one of the most ridiculous series of statements I have ever made.
It was around this time as I moved from fairly whimsical plans to one based upon a little mathematics that I encountered one of the core difficulties with the project. The Periodic Table is a series of columns and rows, 18 columns and including the Lanthanides and Actinides 9 rows. Our boxes have external dimensions of 135 mm square and a depth of 123 mm, this makes for a cabinet that is without any surrounds 2430 mm wide. I know this number very well now because it is exactly 30 mm longer than standard raw timber dimensions. Had we selected a slightly smaller box we would have been inside the magic number of 2400 mm but we were not. The result of this was that every timber purchase was more difficult and only through careful combinations was I able to construct a cabinet of sufficient dimension to encompass our table. In the end for parts I had to resort to laminating timbers together to provide the required lengths, a process I had no plans to incorporate when I initially imagined tackling the project.
The first step was acquiring a piece of MDF suitable to act as a backing for the boxes. Plywood would have been a better and much lighter option but only MDF (medium density fiberboard) was available in the required size. The local supplier fortunately did not have the required size in stock but did have a damaged piece in almost the right size. This was fortunate as it was through trying to work with this piece that I realised the backing board I had planed to mount the boxes to was going to be far too heavy. The order was changed to a piece one third the thickness of the original and with the weight cut by an equal proportion I hoped this would meet my needs. In the end even this piece was far too heavy but a slightly odd solution to this problem was found as described further on.
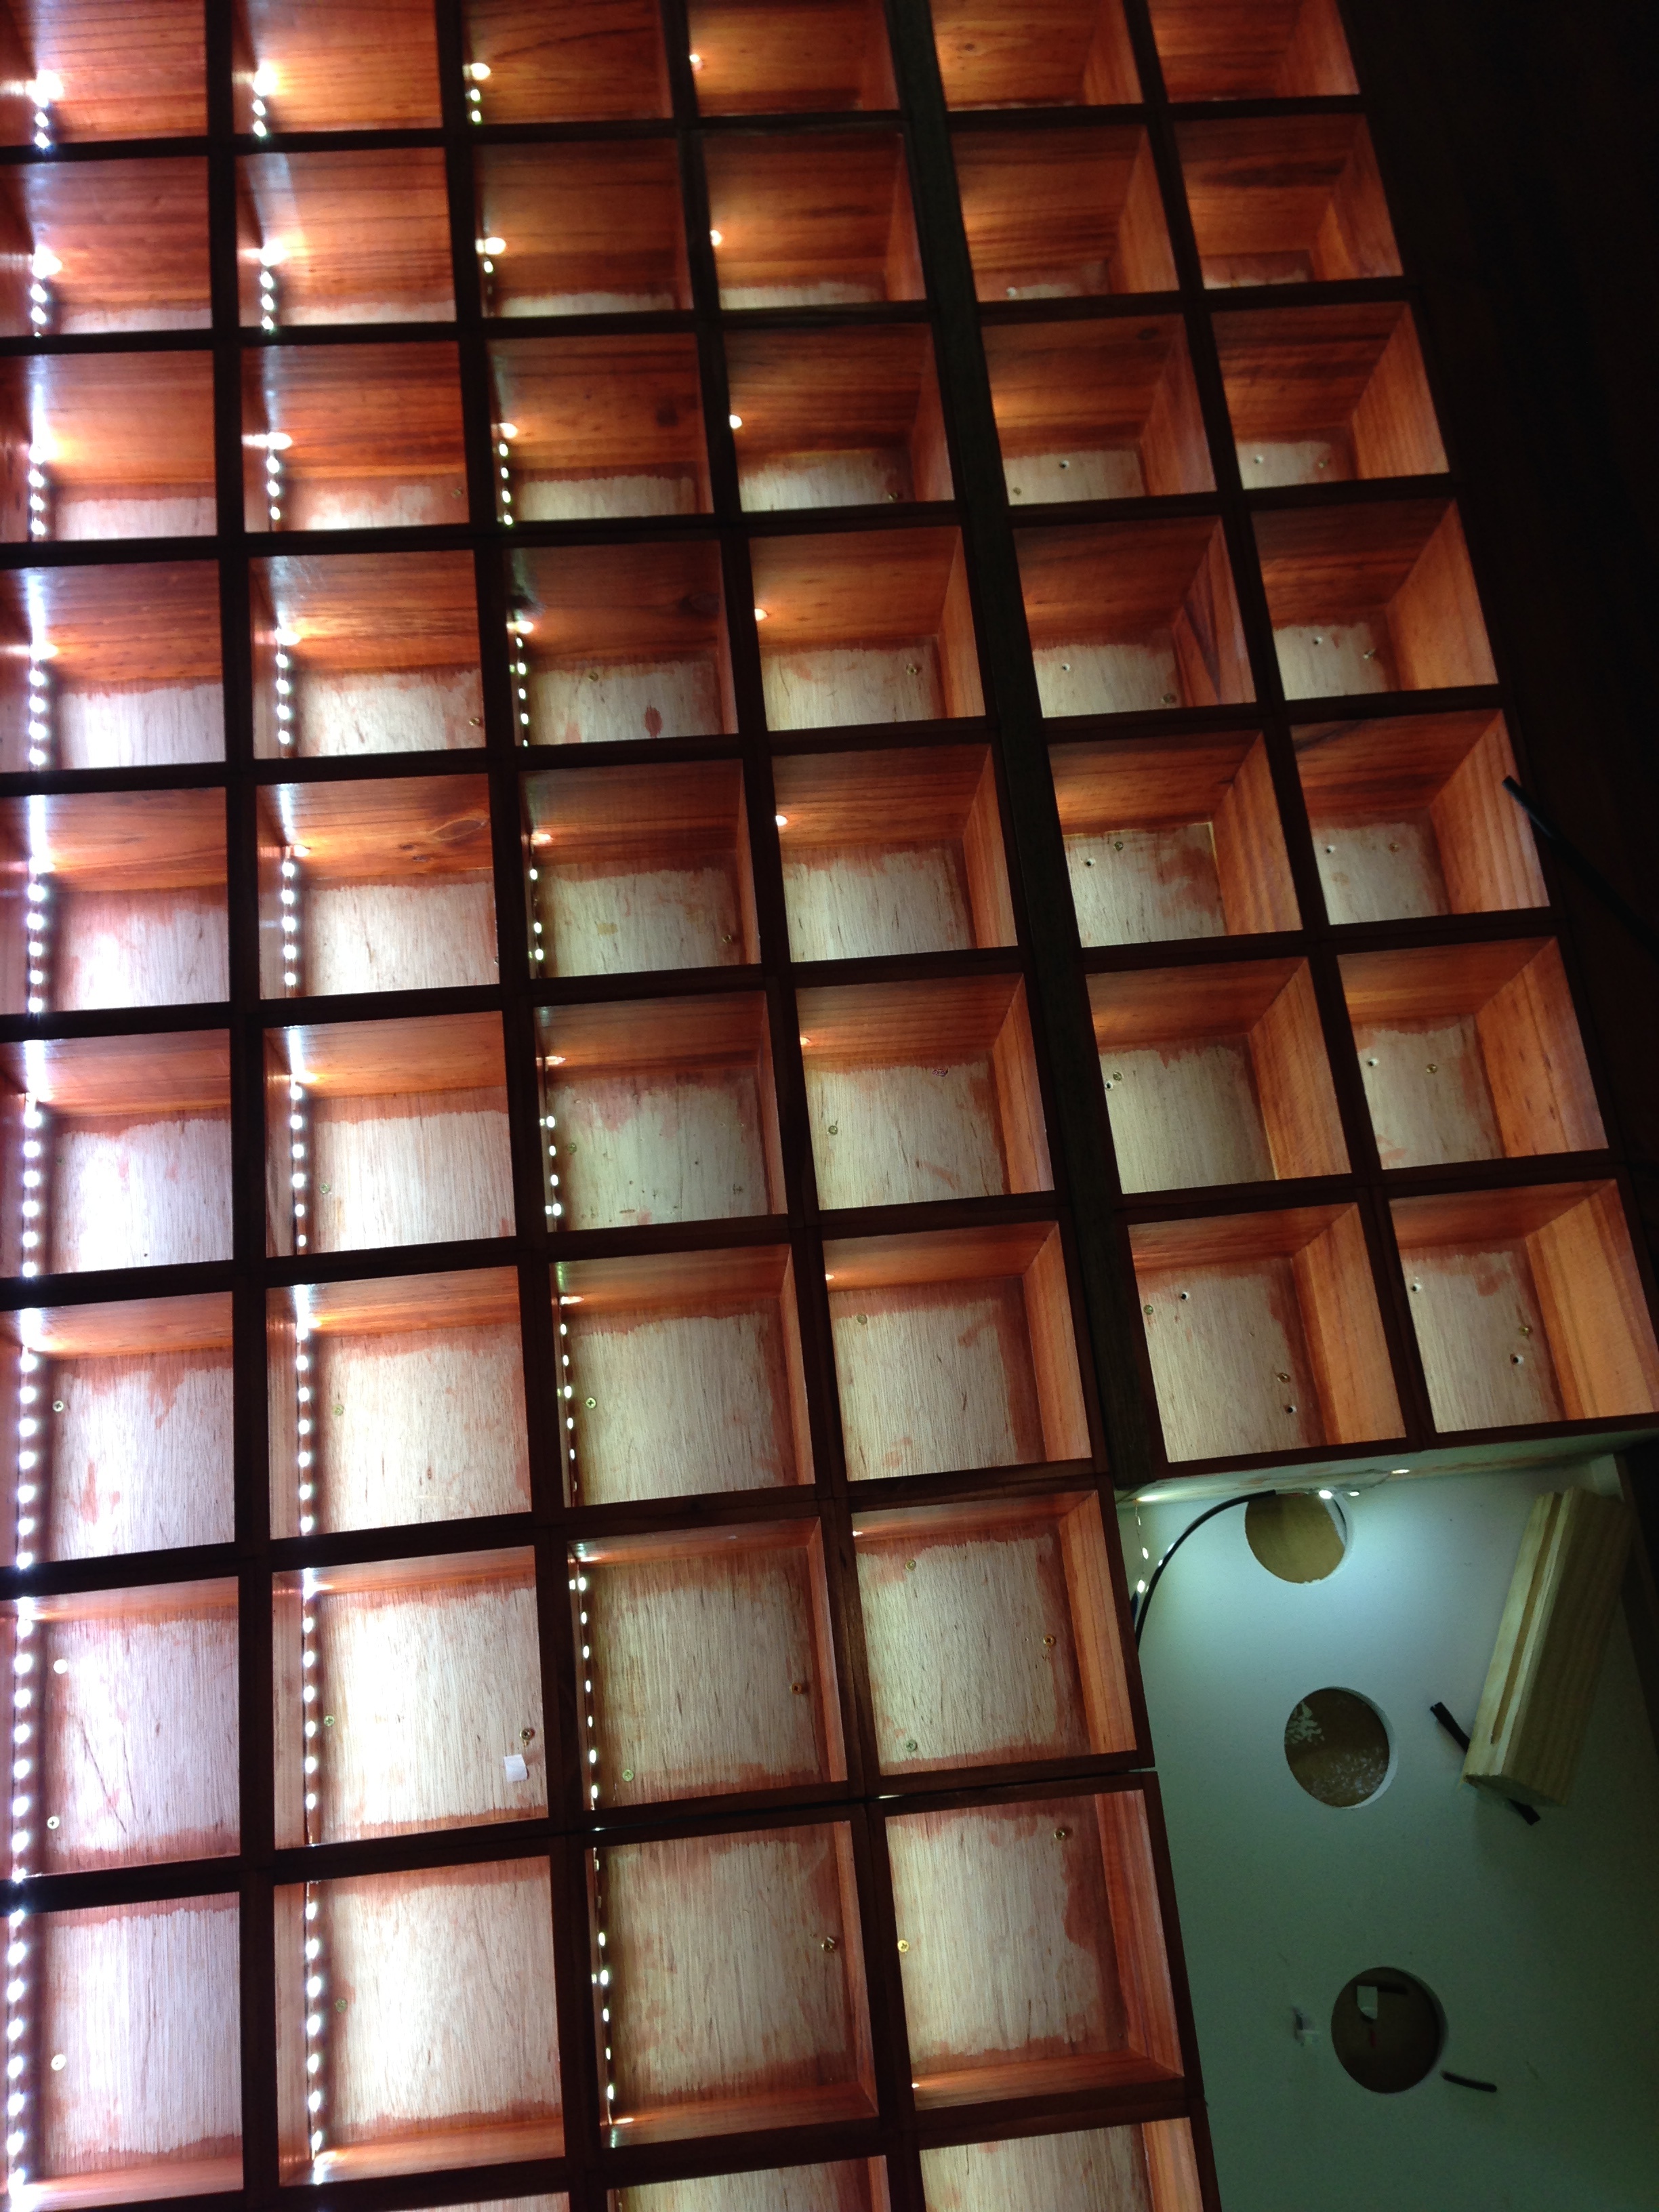
The next step was to begin working with the boxes themselves. Each box required two holes to be drilled directly opposite each other that would allow LED light tape to be run through the rows of boxes. These holes had to be accurately located to ensure they would line up perfectly once the boxes were glued together. This meant drilling 236 holes, each located in exactly the same location on the sides of each box. A drill press and jig made the process easy but even this required careful use. After each hole was drilled the jig would accumulate sawdust and this would affect the placement of the next box in the jig and thus the accuracy of the hole. My solution was to sit in front of the drill press with a supply of boxes at the ready, a vacuum cleaner running with the hose draped over my lap. I would pick up a box, place it in the jig, drill the hole, remove the box, vacuum the jig clean, return the box to the jig and drill the second hole. This process was repeated 236 times. It was only after this that I was able to use a second jig along with hammer and chisel to square off the top two corners of each hole so that the LED tape would have a flat, squared hole to run through. I won’t describe this process; just recalling it is painful enough.
Another of the early challenges was deciding on the final finish that would be applied. The pine boxes dictated that either a quality paint finish would be used or a stain would be applied to add character and visual appeal. I knew very little about wood stains before this project and my attempts to use stains in the past had been dismal failures. Tackling a project of this scale with stained timber should have scared me off but after some extensive research and some great YouTube videos I felt confident to give it a go. This opened a whole new can of worms as we explored the many options available. Samples were created in two types of stain (spirit and water based), 16 different shades and with two different top-coats (Satin and Gloss). In the end we selected a spirit based stain in a Cedar finish with a satin topcoat. The look resembled the finish on the cabinet at Questacon and suits the red wall of the space it will be placed in. Having selected a finish I could move on to the process of staining the 118 boxes and then applying two coats of varnish.
All of this started in August. I had planned to complete the entire process in two weekends with an extra day thrown in to allow easier access to suppliers not open on weekends. By the end of the second weekend I knew this schedule was slightly unrealistic. The drilling of the holes took the best part of one weekend; the painting took much longer. Having to wait fours hours between coats was not the problem, having to paint 118 boxes was, even out sourcing part of this process to my parents was not going to save the timeline. In the end though even the time spent painting the boxes would be only a small portion of the total time that went into the project.
With the boxes stained and varnished I was able to move on to assembling the boxes into columns and the gluing the columns together to form small parts of the whole table; little blocks of boxes typically 4 columns by 4 to 6 rows depending on where that block would fit within the finished cabinet. This introduced two problems. Firstly the boxes were not as square as hoped, not surprising as they are made from wood and little differences add up when you are using so many components. Secondly when glued together some sets of boxes had developed a nasty bow. What caused this I am not sure. In part it was due to clamping the boxes to avoid gaps at the top edge, partly it was that the boxes had plywood backs which held the backs of the boxes wide as the rest of the box changed shape a little around it with the wood drying or absorbing moisture. Either way the problem was the same and this was to become a larger problem when I started to mount the boxes onto the backboard. Had I predicted this I would have glued and screwed the individual boxes directly to the backboard and tolerated a few little gaps between boxes but at the time I felt gluing and clamping in small sets would be the best approach.
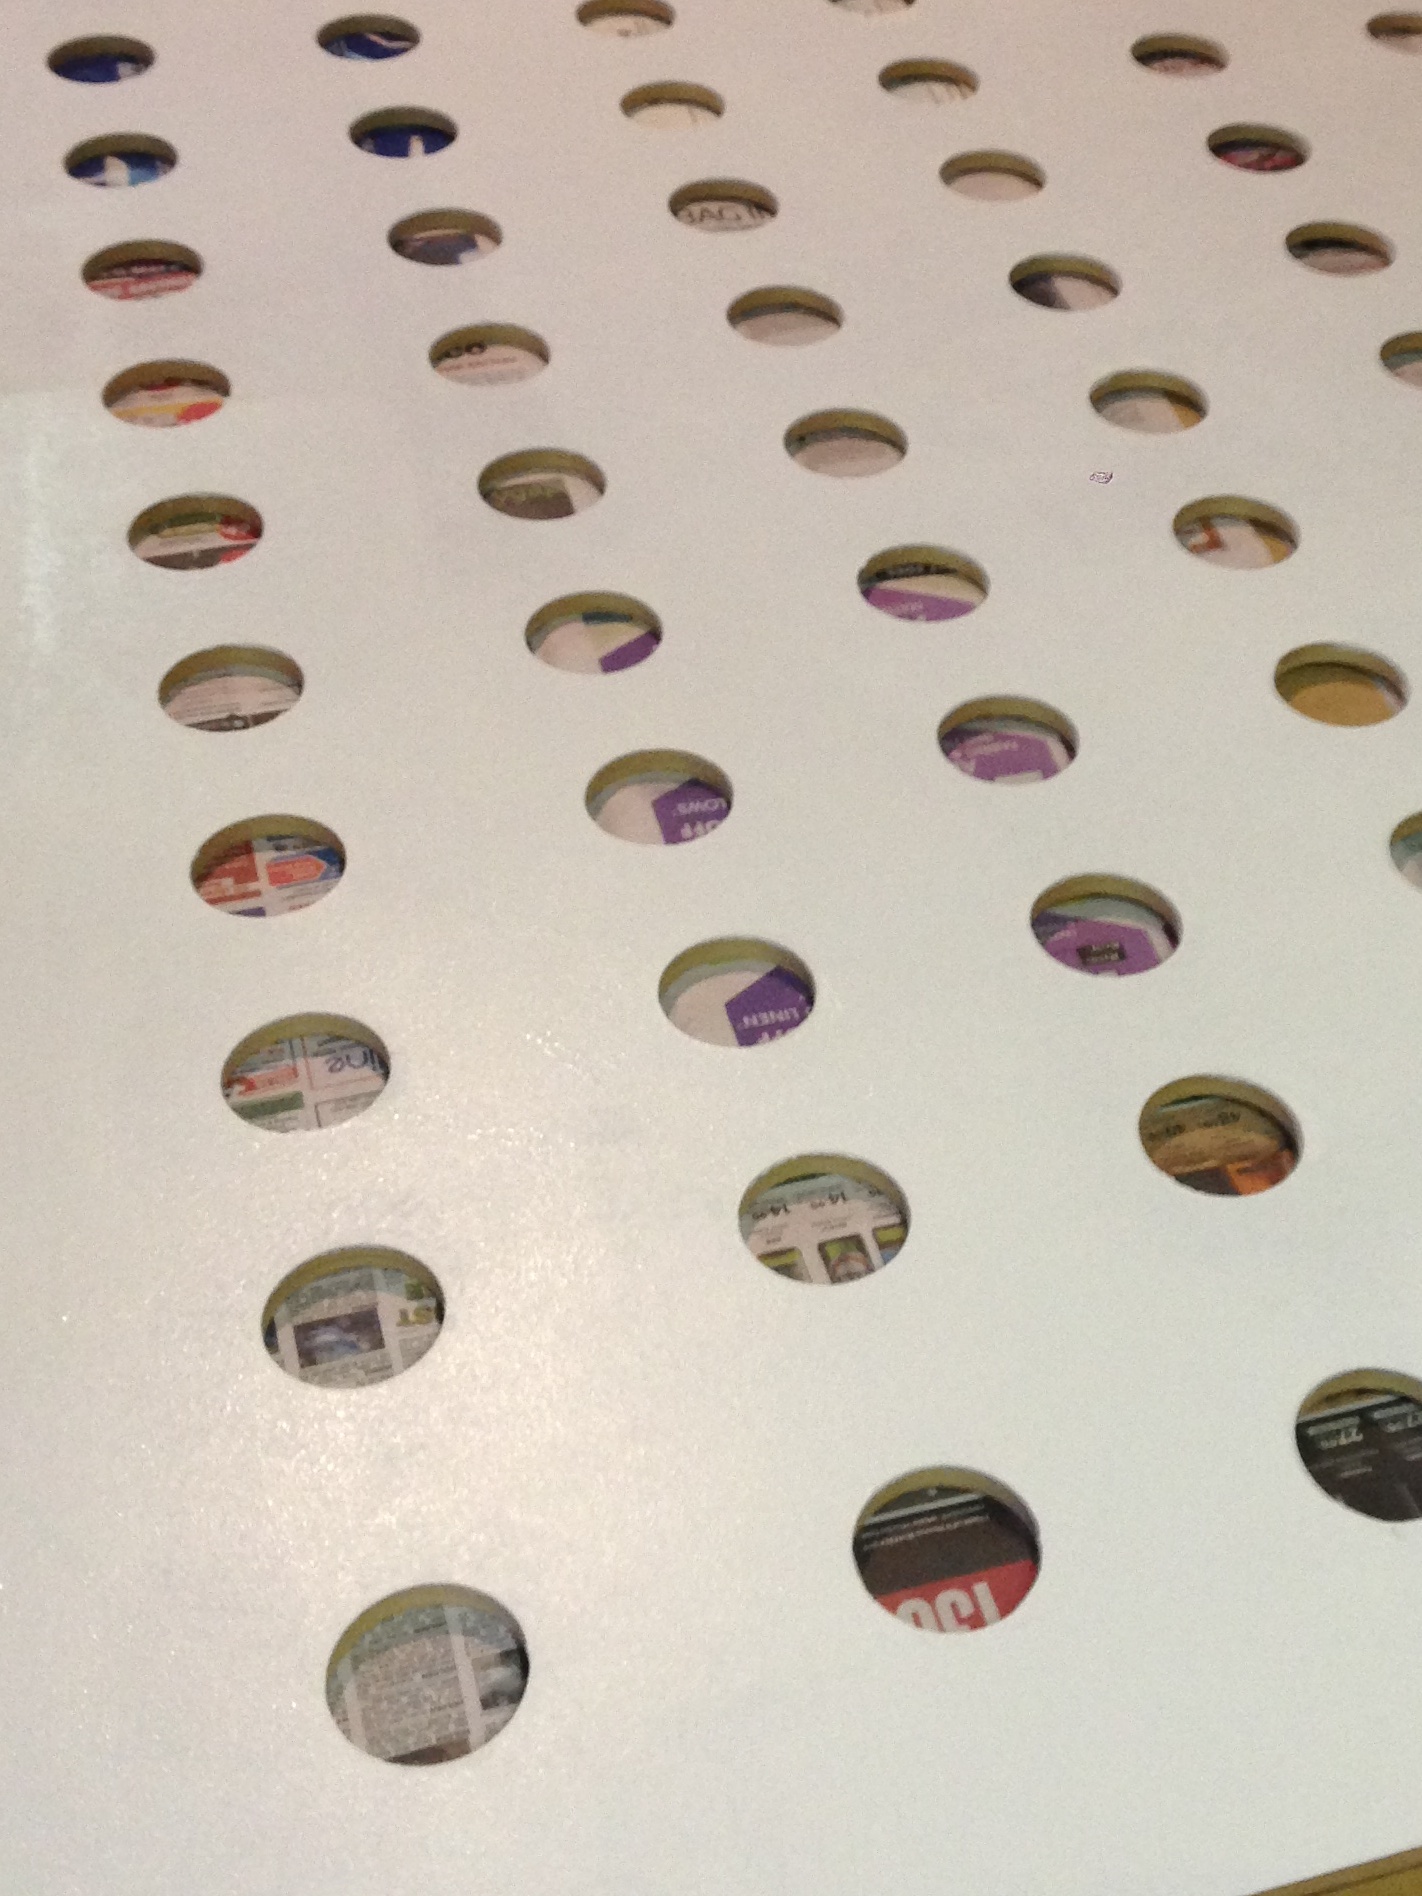
Now that I had the boxes pretty much ready I needed to prepare the backboard itself. This was a piece of MDF 12mm thick and cut to 2448 mm by 1600 mm. Despite having gone to a thinner board than originally planned this piece was still massively heavy, required two people to move and would have put the finished piece well over anything like a reasonable weight. At this stage I decided to try an idea from aeronautics to lighten the load. Aircraft wings are strengthened using a series of spars. To keep the weight down each spar has a series of circles cut out of. The circles remove material from the spar but due to the way a circle sheds forces the spar maintains or even gains strength. This was my solution, I would drill a series of 6 cm holes out of the back board leaving enough material to mount the boxes to and keeping the rigidity that the MDF provided while reaching the overall weight. I also cut the board short and changed the plan so that the backboard would not go to the floor but would pass its weight into the cabinetry base that would lift the lowest boxes to a viewable height. 140 holes later I had a backboard that although still heavier than it would have been in plywood was at least something I could move myself. Two coats of white primer and I was ready to move on.
At this point I turned my attention to some of the cabinetry that the finished piece would require. Many hours were spent sketching options and planning profiles. Some of the pieces were becoming increasingly complex as they include rebates and rabbets to accommodate joins to the backboard and would allow the pieces to interlock. I was aiming for a simple clean look and this was proving more difficult than an ornate look where moldings could be used to hide imperfections. The funny part about this is that most of the pieces of cabinetry that took the longest time and were the most difficult to prepare, hide their complexity from view. A simple join between two pieces of timber with no visible join is the result of this hidden work but the average person will never spot it. I hope that no one notices the pieces of timber laminated together to give lengths longer than 2400 mm, that these joins disappear is something I am quite happy with. In the end it has only 16 visible fasteners each hidden behind a wooden plug. It was around this time that rather strangely the term ’tickety-boo’ entered my vernacular.
As the project went along I encountered a host of new problems to overcome and skills to learn. I had never used a router before and much of the cabinetry work relied upon this. I had to make many accurate cuts with the router in terms of depth and width and doing so with my make shift work bench that was too short for many pieces was proving time consuming as pieces needed to be re-positioned repeatedly to finish one cut. Other pieces were too fiddly to do with the router and so my skills with a chisel were expanded. I came to appreciate a good set of clamps and a small plane. An orbital sander and belt sander came in hand on possibly too many occasions and my best friend was the ever present set-square. From day one I set the goal of having a neat and organised workspace where everything had a place and was in it if not in use. This methodology paid off as time went by and I wasted little effort looking for things I would otherwise have misplaced. I now need to apply this approach to my desk at school.
As the project came together I realised that what I should have done as step one was construct a work bench large enough for the finished piece to sit on, one that was completely level. What I had was a pair of sawhorses, a couple of steel beams from a single bed and the original piece of MDF I had used to mock up the original layout on. The floor all this sat on is nothing like level and the whole arrangement bowed towards the edges. This ensured that the level of accuracy I had planned to achieve was difficult if not impossible. This was probably why no one else was keen to take on the project in the first place as they new they did not have a workbench large enough. In the end it worked out OK but this was a good lesson to learn for any future projects.
As the pieces came together little changes to the plan had to be made. Just in gluing the boxes together the width of the cabinet had grown by 18 mm. That is a gap of only 1mm per column but more than my original small scale testing had suggested. I also ended up with an odd difference in height from one side to the other, much of which comes from just four boxes on one side being slightly smaller than their colleagues on the other side. All this meant that I had to rethink the sides of the cabinet and pull some little tricks with the top plate so it would at least look square. At last when I did get the sidepieces on the whole cabinet gained a degree of rigidity it had lacked. The sides also had the effect of tying it all together so it no longer looked like a collection of boxes but became a single piece of furniture.
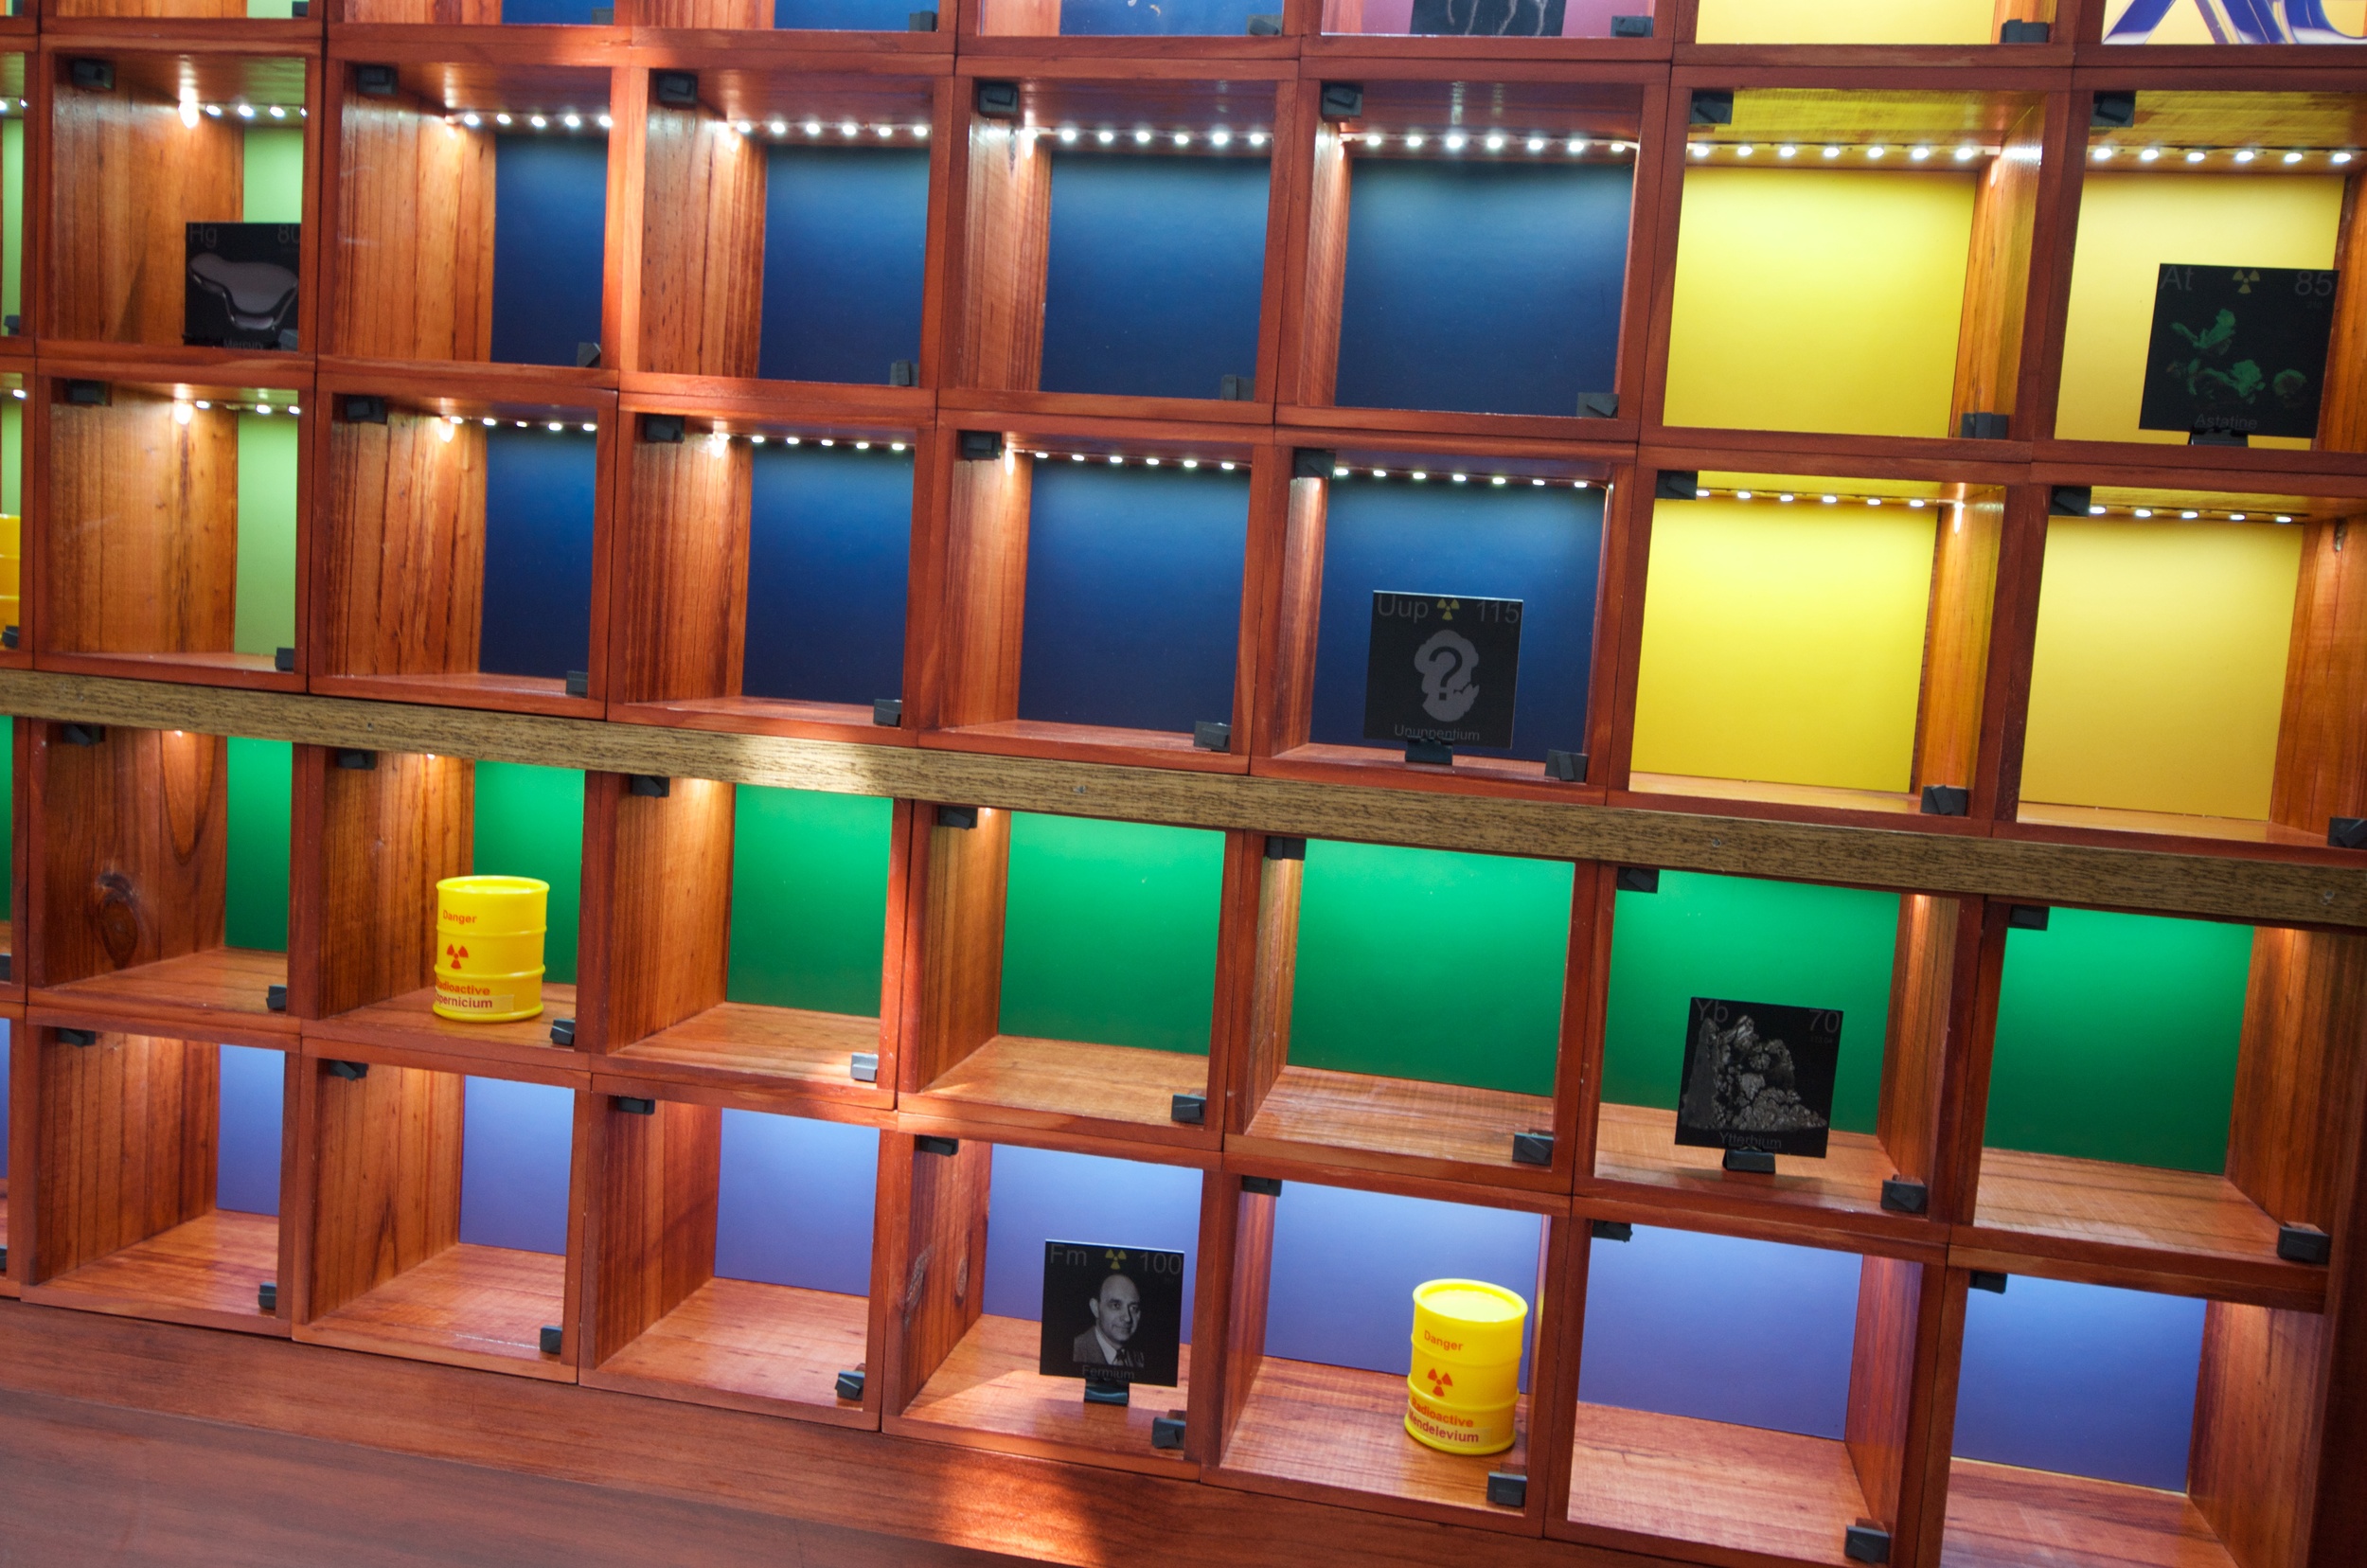
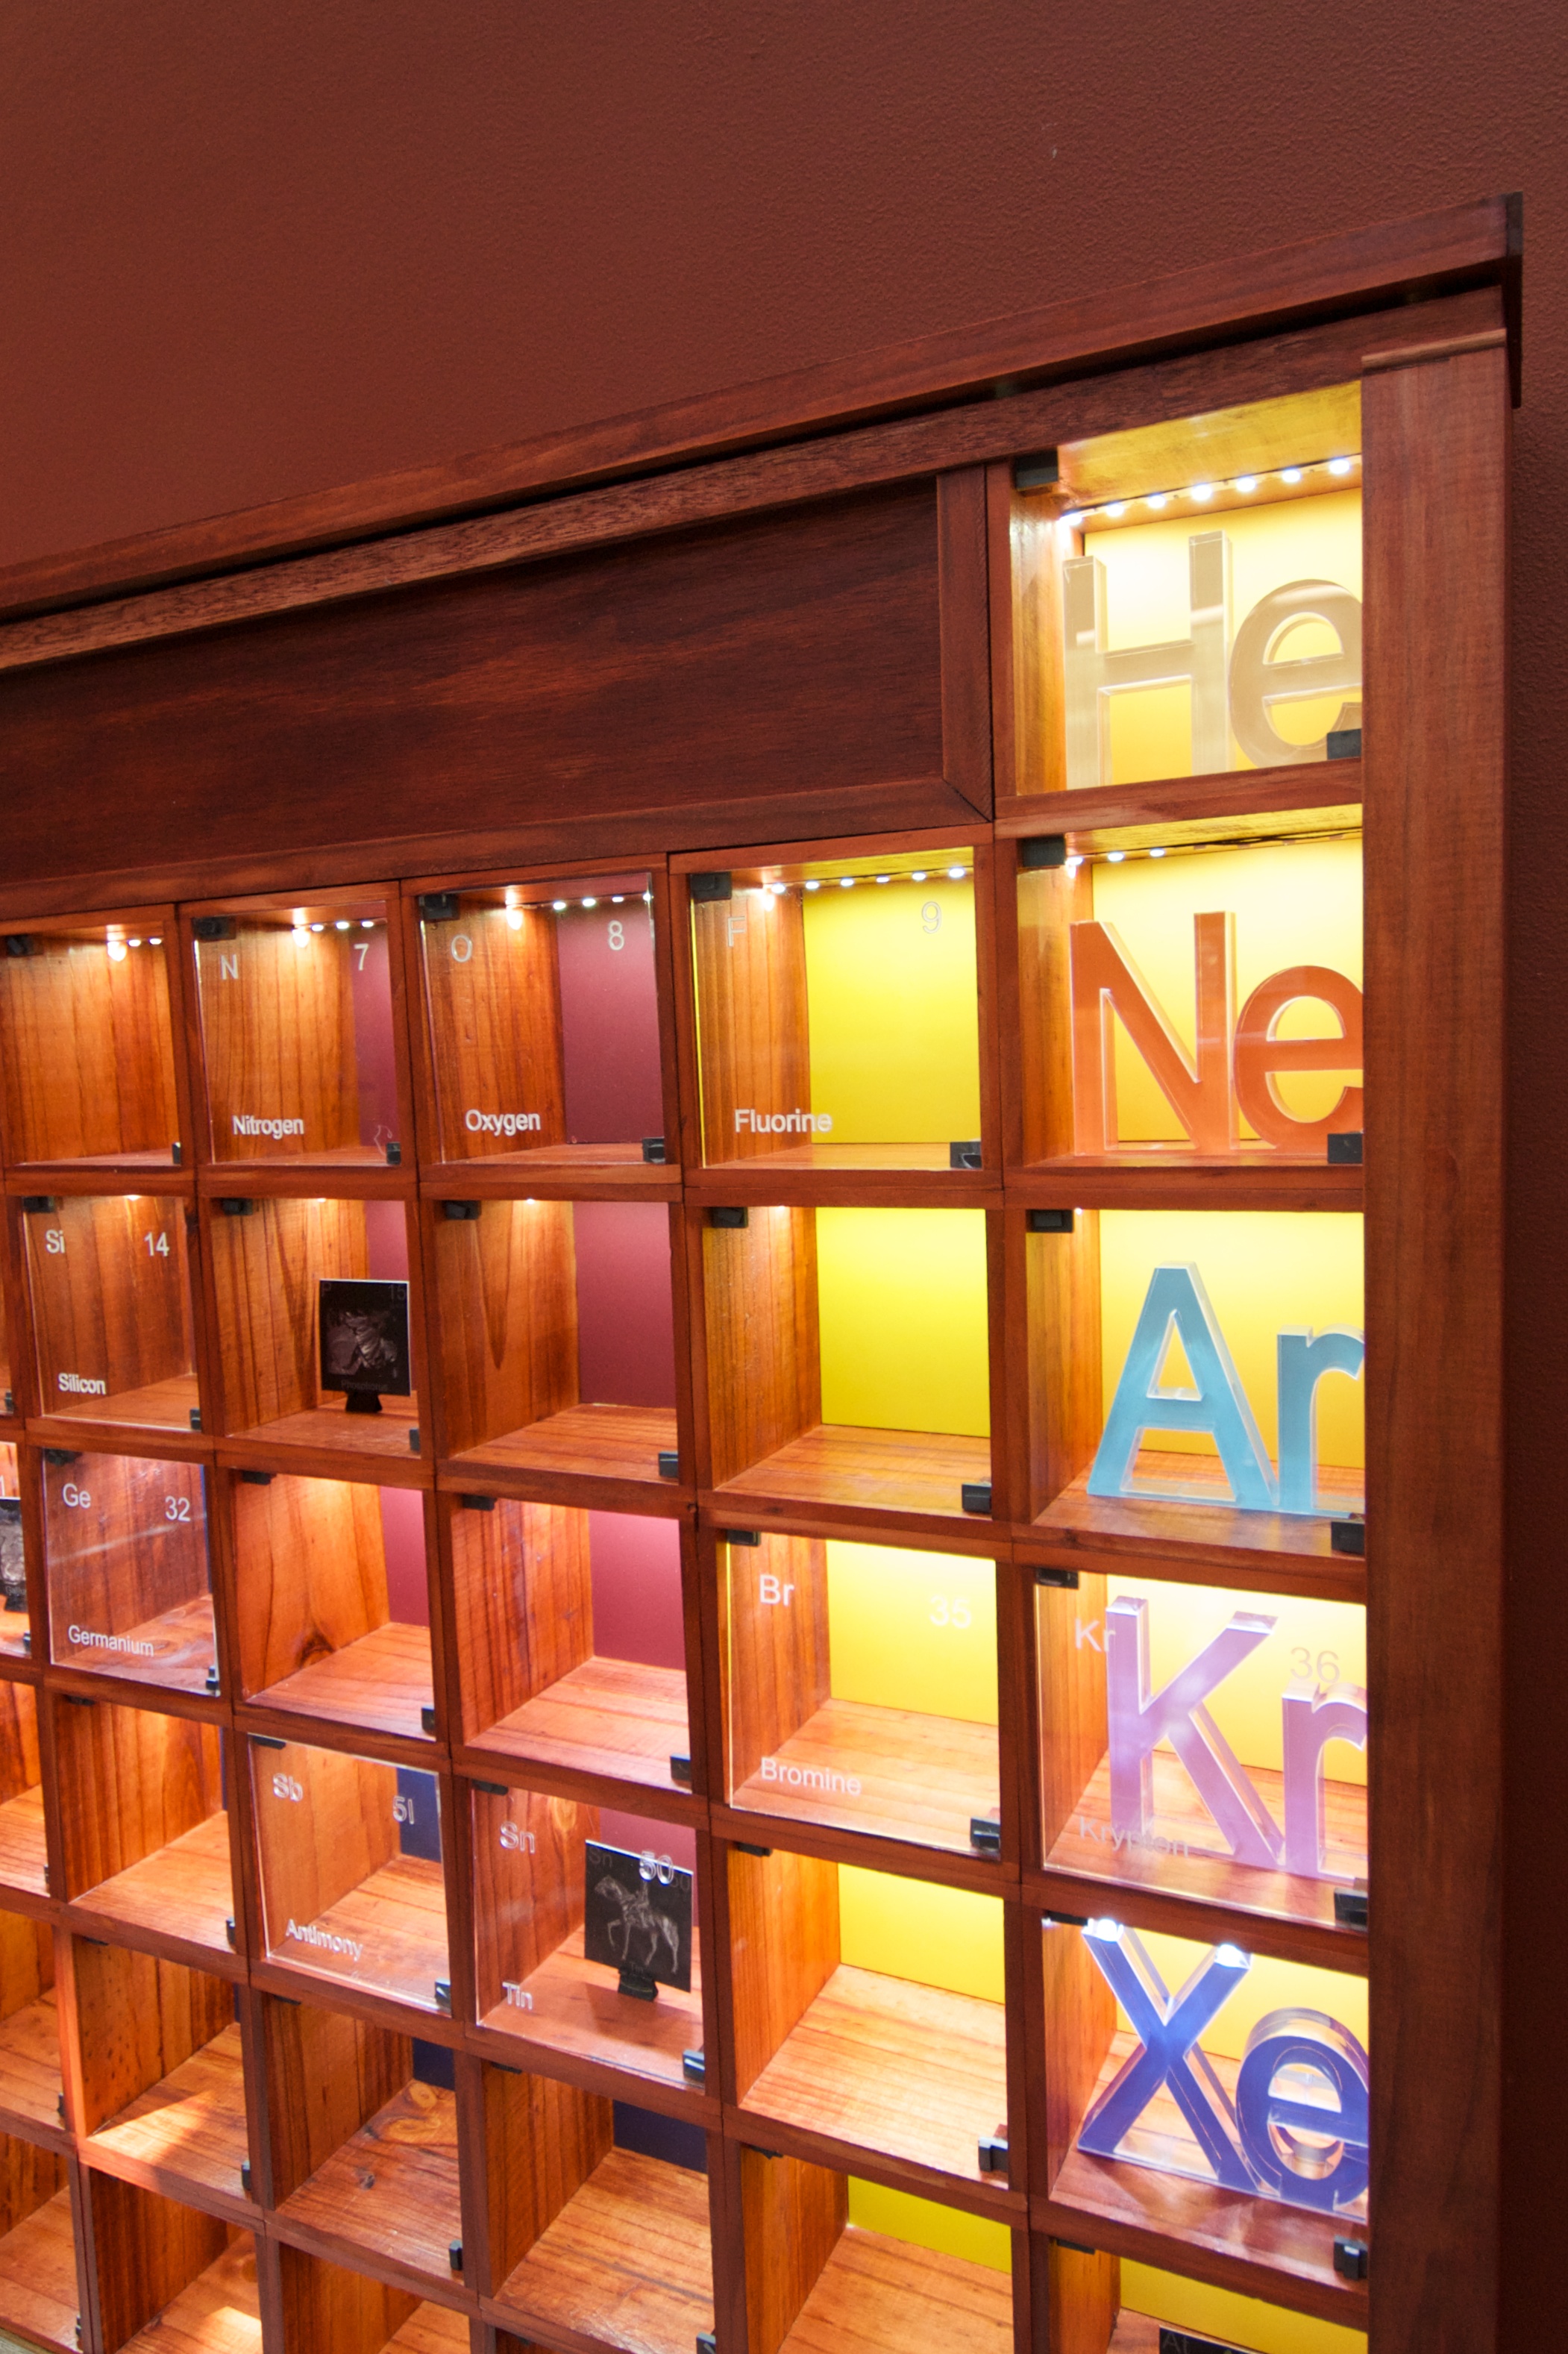
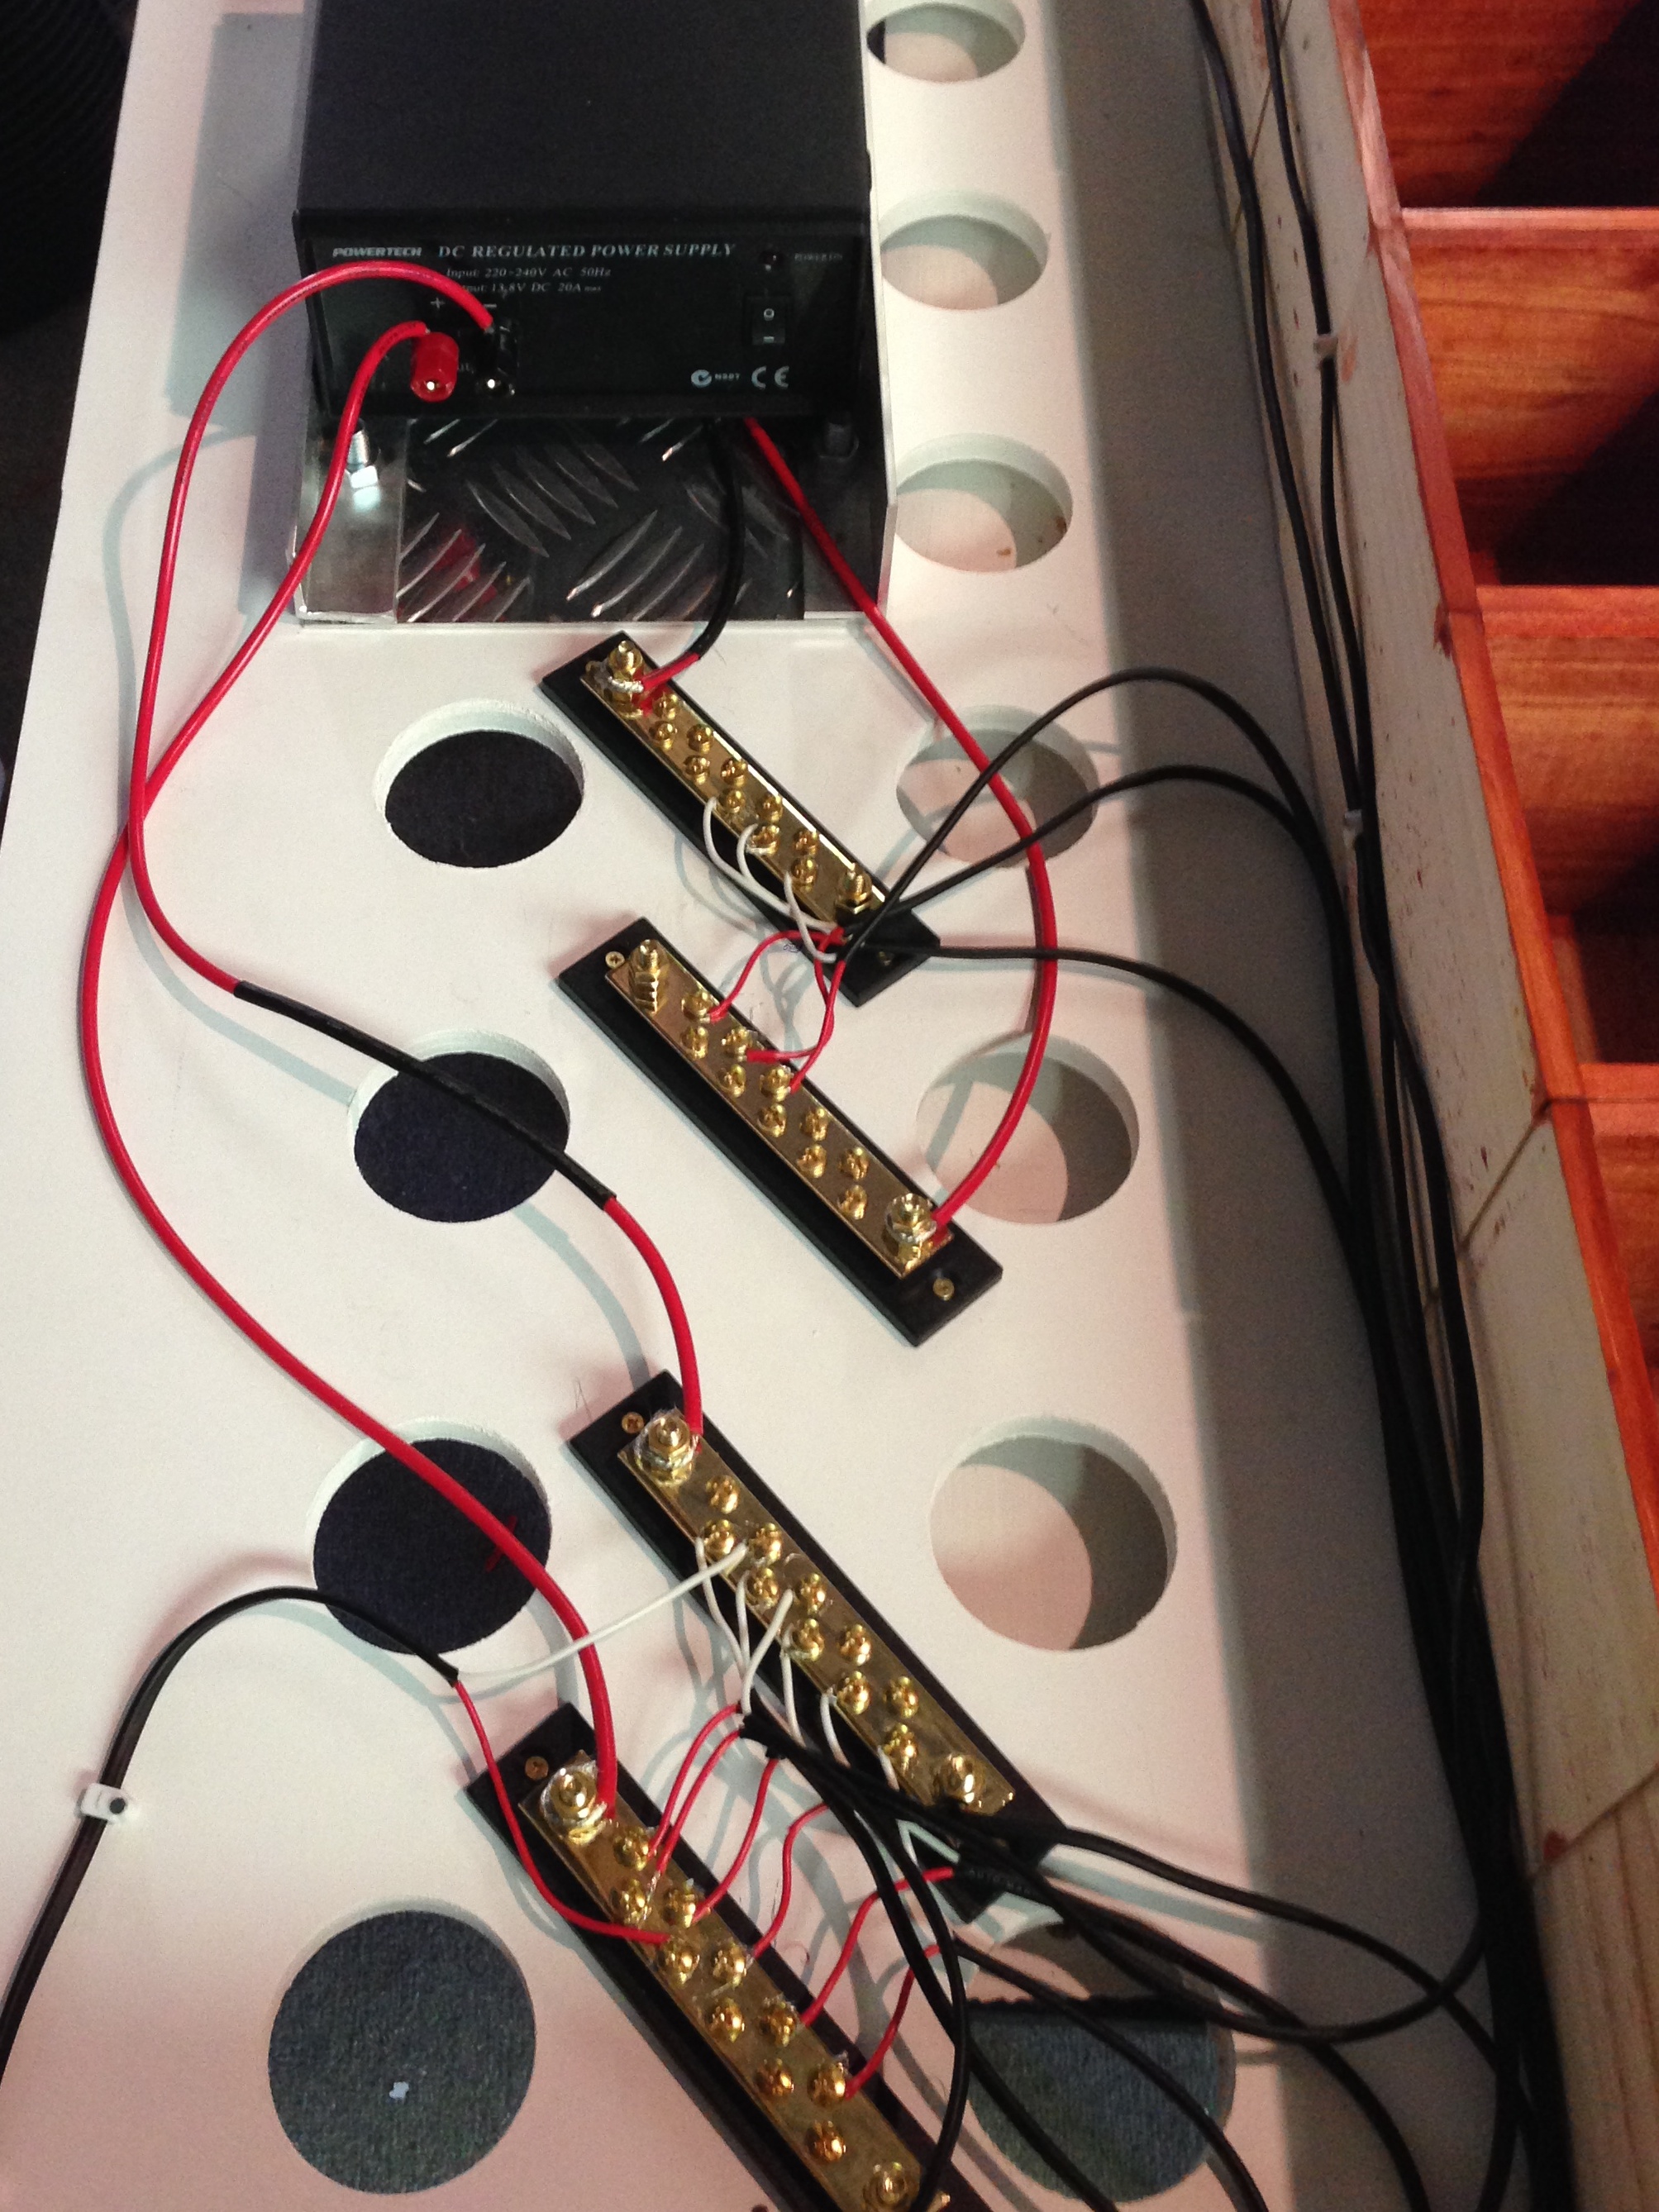
In between I had to fit the lighting and work out how I would run the many metres of self-adhesive LED tape through the previously drilled holes. Purchasing the lighting had been a significant expense. Each roll was 5 metres long and the cabinet required just over 4 rolls. Each metre of tape required 1.1 amps of power and as a result the cabinet uses two transformers able to provide a total of 32 amps of power in 12 volts DC. These are hidden in a void at the top of the cabinet between Hydrogen and Helium and mounted to an aluminium plate to help with heat dispersal. Initially I was concerned about the amount of heat these transformers would produce but testing has shown they increase the temperature of the surrounding air by as little as two degrees Celsius. Running the lighting and wiring allowed me to develop my skills with a soldering iron particularly when fixing wires to small copper tabs on the tape and required the use of four bus bars to distribute the power. The bus bars are lovely pieces of industrial design, resplendent in copper but hidden from view as is all the wiring. The LED lights however are not hidden and do an amazing job of illuminating the boxes. With an average of six little LEDs per box the display is certainly well lit and thanks to coloured cards placed at the rear of each box to colour code the elements it is a bright piece. These cards were professionally printed by a parent of the school and made the job of adding the colour coding the table requires easy.
Each box is fronted with a piece of acrylic laser cut to fit and with the name, symbol and number of each element etched into the front. Setting up the files required for the laser cutting and etching allowed me to learn Illustrator and the particular details required for the laser cutter to make sense of the information; red lines are cut, blue lines are etched. The laser cutting was done by our Senior School’s ‘Innovative Design Department’ and the result is excellent. Each piece of acrylic is held in place with magnets and can be easily removed to give access to the items in the boxes. Mounting the magnets was another one of those particularly fun tasks with each box requiring two small cubes of wood to be glued into opposite corners. Each cube had to be stained to match the rest of the cabinet. Onto each cube a magnet was glued and then onto each piece of acrylic magnets were glued to line up with those in the boxes. A small jig ensured the cubes were all placed at the exact depth required and then great care had to be taken to ensure the polarity of the magnets on the box and on the acrylic worked to hold the two items together and not push them apart. As the magnets were glued to the acrylic with super glue this was a one shot deal. As a person more used to working in a digital space I missed the pixel perfect accuracy possible in software and an ‘Undo’ button.
I am now overly familiar with the names of the elements having typed them for each of the acrylic covers, again for the name of each page of the website that will accompany the cabinet, again for each of the Photoshop files that appear on the website, again for the links to each page from the virtual Periodic Table and lastly again for the links to the image files on the website. My favourites are the yet unnamed elements, the Ununoctiums and Ununpentiums etc. I hope it is not too soon that they are discovered and named as I am not overly keen on having to make the updates just yet.
It is now November and the cabinet is finished and delivered. It ended up 2520 mm wide and 1560 mm high. Overall I am happy with the look of it and hope it makes a great addition to the space it goes into. I have no real idea of how much time it took in hours; it is over 30 days of full-time 7 am to 8 pm work plus many evenings after school. Essentially every weekend for three months plus ten days in the September school holidays. Most of this time I have enjoyed having the project to do, the times when I wished it was finished and done with were few. I have definitely learned a lot from doing it. Better than the knowledge of cabinetry I have gained are the insights into problem solving it has provided. As each new problem was encountered I had to apply the same sort of process I teach my students as they work through problem based learning experiences. Where I rushed in, I made mistakes, as I went along I did this less often, I slowed down, looked at the problem and thought through the solution trying to gauge what problems it might lead to. I looked for answers online and found a wealth of good sources I could trust. Every time I encountered a completely new problem I was reminded of how my students must often feel as they encounter new challenges. At times the solution came easily, at other times it was a long, frustrating process. In the end I was able to solve each of the problems that came my way and as a result have gained confidence in my ability to do so. I developed the attitude of ‘I have no idea what I am doing. . . yet” and in this way kept moving forward until I found the fix I needed. At these times it might have been nice to have an expert on hand to provide the right answer and I am sure some of my solutions would make a cabinetmaker laugh but in finding an answer myself I feel I learned more and it is this sort of learning that I want for my students.
Finishing the display cabinet is only the first step in this project. We now have a mostly empty set of labeled boxes waiting to be populated with samples and replicas. Each of the radioactive elements will have a small yellow drum with appropriate warning signs and the name of its element on the side. The drums look like the sort used for transporting waste but are a novelty container for selling that oozing slime children love to play with. Some of the elements will be easy to find samples of, others almost impossible or pose too much of a danger to have the real thing. The noble gases for now will be represented by acrylic letters in the colour that they produce when electrically excited, maybe down the track we can replace these with neon lights filled with the appropriate gas. Each box will link to a webpage created by the students and full of information about the element. Each webpage will include a short video produced by the students and it is in these aspects of the project that it gains meaning as a tool for learning. As it becomes a project of the students creativity and learning and less about being a cabinetry project for me it transforms into a meaningful object.
For me this was a first hand experience with the type of leaning advocates of the ‘Maker Movement’ champion. With my curriculum hat on the number of outcomes covered in such a project would be enormous but at no time did I stop and think,’ I am doing maths now’ or ‘isn’t it good to utilise my comprehension skills’. Every part of the process had genuine meaning and the learning was immediately applicable. I also received immediate feedback as the plan either worked and looked good or it didn’t. In most cases where things didn’t work the result also revealed where I had gone wrong and provided hints at a better way of moving forward.
Some people may wonder why a Junior School needs a Periodic Table of Elements, after all it is not a part of the primary curriculum and surely we don’t expect our students to learn this sort of content now. Fair comment but this misses the point. The role of this Periodic Table is to be a beacon that attracts students to the sciences, a piece of marketing aimed at sparking inquisitive students to wonder what it is all about. It marks the space it occupies as the doorway not only to the science lab but as the doorway to the Sciences and reveals just a little of the mysteries that lay waiting for those with curious minds.
Would I take on a project like this again? Yes, but probably not in the next few months. I did learn from this that the initial plan was flawed and while I managed to make it work there are better ways of tackling this exact project. There are times when I think it would be interesting to try the same project again using the lessons learned from this effort. Would I recommend others do the same? That depends on how much you value your sanity. It is absolutely worth having that ridiculously oversized project if it is something you love doing, something that will occupy all your spare time but that at least most of the time you look forward to returning to. Just don't keep too close an accounting of the time it swallows or expect other people to understand why you are doing it.